TRANSFORMING DREAMS THROUGH VISION

VIDEO SOLUTIONS FOR EDUCATIONAL INSTITUTIONS
Nurture your students' education with video solutions from us. Live video production is an intellectual “team sport” that develops a student’s technical skills as well as their social skills. Learning live video production is fun for students because they can learn hands-on and through discovery. The combination of immediate feedback from live editing, teacher guidance and the desire to succeed can help a student’s creativity blossom and create a positive learning environment.
We will work directly with your school to select the right equipment for your needs. We have an extensive lineup of easy to use mobile studios, video switchers/mixers, video recorders/players, monitors, and accessories that are designed to give you great results without breaking the budget.
We hope you’ll be enticed for more information on your next video production purchase. If you would like to be contacted by our representative, please complete the short form below.
So what are the benefits? All of the skills below are transferable and can be used in all walks of life.
Create a new curriculum:
The Broadcast and TV production unit used in some of our school packages is used in a lot commercial video production studios in the US.From small community studios to commercial broadcasters, stations around the world rely on these systems for all their video broadcastcasting needs. These are the same tools and facilities you need to run a full time video production unit.What is more because the software we supply isn't restricted or simplified,your students will be using the exact same tools that we supply to the broadcast industry!
Communication skills:
Enhance the students' ability to communicate in writing (i.e. scripts and programmes for broadcasting); confidence in speaking over the air-ways and their ability to communicate with the broadcasting team.
Confidence building:
Give students the opportunity to be in the public eye (or ear). Let them give vent to self expression and on-air debate. By improving speaking and listening skills, motivation, confidence and self-esteem, the use of TV broadcasting in education links in directly to the Every Child Matters agenda
Creative thinking:
Script writing, dramatisation, programme development and effective communication all require a creative mind.
Developing awareness of current affairs:
Broadcasting can enable the students to be aware of current socio-economic and political issues as they research their programme material.
Language development:
Programme writing, story telling develops language skills and the ability to commit thoughts to paper.
Interviewing skills:
Students can develop their interviewing skills as they prepare and deliver questions and answers for their programme.
Journalism skills:
Creative thinking, research, writing and broadcasting can enhance the skills of a budding young journalist.
Research skills:
Broadcasting can encourage students to think deeper about their programming material and to strengthen their research skills for their selected projects.
Teamwork:
What a thrill to be a member of a broadcasting team. Students can learn the benefits of working together in a busy and exciting environment and can plan operation of the studios.
The simple to use, reliable video studio packages are ideal for use in primary schools, secondary schools, college and university environments and give a true feel for what it’s like to be in a TV studio because the equipment is broadly the same as that used by professional broadcasters, just discounted for use in education.
Broadcast Quality HD Production for beginners
Broadcast Quality HD Production for Beginners: Hi-Def Video production with Ottis Jones and Datavideo By Scott Gentry | October 03, 2010
In this five-part series, we will look at a real world case study of a facility that took on the daunting task of upgrading to HD. These parts will cover:
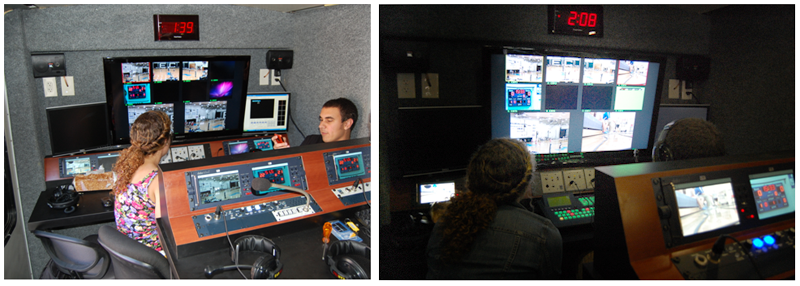
Three years ago, Ottis Jones knew nothing about video production when he started producing for The Old Fashion Gospel Hour in Hendersonville, TN. It was a TV ministry set up by a local church, and as most ministries are, it was run by volunteers. Over the years however, the ministry has grown so much that it gets broadcast in several communities in 3 states. It was no easy feat for Ottis to put together a studio that could produce broadcast quality HD footage, especially with no experience, but through research and trial and error, he's done it quite successfully. This 5 part series will cover how he did it, sharing valuable tips to how you can do the same on a tight budget, and also save yourself some time-consuming mistakes.
Tip 1: Assess your goals
When asking yourself what your goals are, you have to think about how and why your production is happening. This may seem like an obvious suggestion, but many times there are details that are missed because the goal wasn't properly assessed. Are you taping a show and editing it later or producing it live? How is your final output going to be broadcast? Internet stream? Broadcast television? Straight to DVD? Is it in NTSC or PAL? Are you going to need to do titling for a more professional look? Do you have a set location, or are you a videographer who is going to take your production mainly on the road? Determining all the details within your goal early on will allow you to narrow what type of equipment you will need and create a budget. It will also help whoever is selling you the equipment know what you want to accomplish.
Ottis called us early in his planning process and we were able to help him understand what he needed for his set up with consideration to his budget and the final output. His main goal was to upgrade the studio to HD but he also wanted to get the best pricing available in order to do so. His planning always went back to addressing his main goal when building his studio. By the time he spoke with our reseller, he wasn't hoping that he got what he needed, he was sure that he got what he needed.
After speaking with us several times, he suggested that it would be helpful to let people know how easy it was to make the switch to HD, because he was a bit intimidated at first. That suggestion was a main factor in why we decided to write this type of article. We were happy to help him fine tune his planning process until he had a resolution that he was completely satisfied with. That leads us to the next tip:
Tip 2: Do your homework
Here are some key things you should look for or know about when equipment hunting:
Ottis : "I cleaned up the studio and got everything off the floor in regards to wires and all of that. It's much easier to get around and work in the studio, when it's not so cluttered."
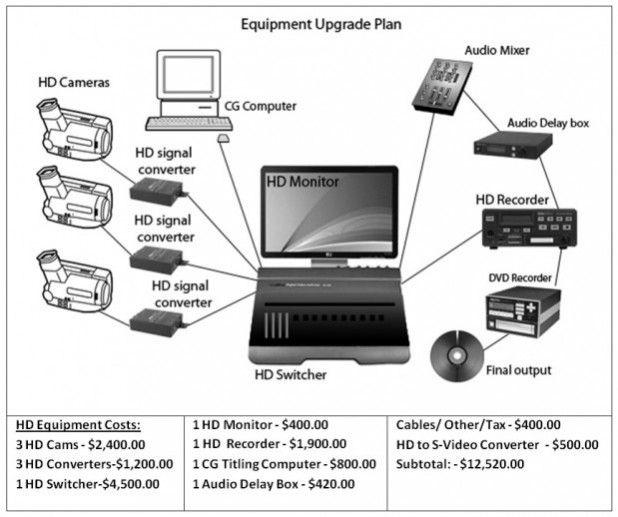
Here are two sample diagrams similar to what Ottis had emailed to us when he was making his proposal. (These are not the actual costs of the equipment that Ottis bought.)
Ex 1 - This is a visual representation of what Ottis needed, and list of what it could cost.
These first steps will help you achieve your goals much faster and much more accurately. Properly planning in the early stages is essential to getting the best production out of your studio. In Part 2, we'll talk about which equipment Ottis bought, and go step-by-step on how it is interconnected.
In this five-part series, we will look at a real world case study of a facility that took on the daunting task of upgrading to HD. These parts will cover:
- Part 1: Getting Started - assessing your goals, making overall decisions with regards to cabling and formats, designing your new system.
- Part 2: Setting Up The Studio - building the signal chain from cameras to switcher to monitor to recorder.
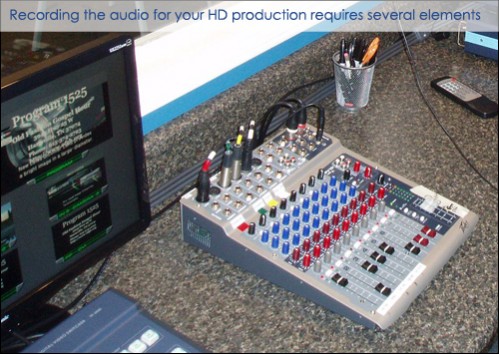
- Part 3: Recording the Audio and Video - set up, monitoring, recording, and transferring files, including particular attention to the audio.
- Part 4: Character Generation - including preparing your slides in PowerPoint and converting them into nice overlays.
- Part 5: Editing and Distributing - from acquisition through uploading files for the internet.
Three years ago, Ottis Jones knew nothing about video production when he started producing for The Old Fashion Gospel Hour in Hendersonville, TN. It was a TV ministry set up by a local church, and as most ministries are, it was run by volunteers. Over the years however, the ministry has grown so much that it gets broadcast in several communities in 3 states. It was no easy feat for Ottis to put together a studio that could produce broadcast quality HD footage, especially with no experience, but through research and trial and error, he's done it quite successfully. This 5 part series will cover how he did it, sharing valuable tips to how you can do the same on a tight budget, and also save yourself some time-consuming mistakes.
Tip 1: Assess your goals
When asking yourself what your goals are, you have to think about how and why your production is happening. This may seem like an obvious suggestion, but many times there are details that are missed because the goal wasn't properly assessed. Are you taping a show and editing it later or producing it live? How is your final output going to be broadcast? Internet stream? Broadcast television? Straight to DVD? Is it in NTSC or PAL? Are you going to need to do titling for a more professional look? Do you have a set location, or are you a videographer who is going to take your production mainly on the road? Determining all the details within your goal early on will allow you to narrow what type of equipment you will need and create a budget. It will also help whoever is selling you the equipment know what you want to accomplish.
Ottis called us early in his planning process and we were able to help him understand what he needed for his set up with consideration to his budget and the final output. His main goal was to upgrade the studio to HD but he also wanted to get the best pricing available in order to do so. His planning always went back to addressing his main goal when building his studio. By the time he spoke with our reseller, he wasn't hoping that he got what he needed, he was sure that he got what he needed.
After speaking with us several times, he suggested that it would be helpful to let people know how easy it was to make the switch to HD, because he was a bit intimidated at first. That suggestion was a main factor in why we decided to write this type of article. We were happy to help him fine tune his planning process until he had a resolution that he was completely satisfied with. That leads us to the next tip:
Tip 2: Do your homework
Here are some key things you should look for or know about when equipment hunting:
- Video signals and Cables - If you already have some video equipment in your arsenal like video cameras or DV recorders, find out what signals they require or accept. This will help especially if you can't afford a full upgrade to HD. You can still produce HD quality stuff-it could be as simple as converting the signals that you already have to high definition.
In his upgrade, Ottis purchased three new Panasonic HDC TM700's (HDMI out) but he decided that he wanted to just get a few HDMI converters (Datavideo's DAC-9) rather than get HD equipment all at once. He also decided he wanted to purchase an S-Video converter to back up his SD footage to DVD and other digital formats. Knowing your video signals can widen your options, but it can also narrow down the decision for the best solution in your studio. Cables - BNC, XLR, FireWire, SDI, component, and composite-the list goes on… There's a myriad of them out there, and if you're just getting started, getting a basic idea about which cables carry what signal is prudent. It's also good to know what each of them looks like. It's another one of those details that can save you tons of time and money. - Resolutions - 4:3, 16:9, 720p, 1080i, and 40 or 50 and even 60 Hertz- what's it all mean? You'd be surprised how many people buy equipment without knowing what resolution they are working with or what they will be outputting.
Why is this so important? Example: You have a camera that has HD-SDI outs and you connect into a switcher that accepts HD-SDI, but you still don't see an image on your monitor. Is the switcher broken? Is your camera fried? A frantic call to technical support ensues. The issue could be as simple as the resolution or hertz isn't matching up. Your equipment is fine!
You don't have to go out and be an expert on resolution and hertz, but at least know what your equipment is sending out. Knowing will also help you define what HD is truly and what is not. Just because the picture quality looks amazing, doesn't mean it's actually HD. High definition is defined by a specific number of lines of resolution that appear on a screen. When Ottis was writing the proposal to the board of directors, he was able to define the quality and technical differences between SD and HD where as it might not have been clear when just looking at high resolution footage. This simple knowledge can save you valuable production time, money, and a serious headache when putting together the components for your studio. - Tip 3: Inventory what you already have, what you need, and determine a budget. If you have equipment that you can use, it's the first step to saving you money. The first proposal Ottis wrote for funds to upgrade the studio drew up a 20,000 dollar price tag- not a crowd pleaser- but at least he had a figure that he could start working with. Ottis reworked the proposal several times, and was able to whittle the price tag down to $12,000 in the end. But while he was doing that, he just worked with what he had. He was able to assess what wasn't absolutely needed, what he could get rid of, and what he needed to purchase. This assessment helped him break up the upgrade into phases, which significantly eased the cost of an upgrade.
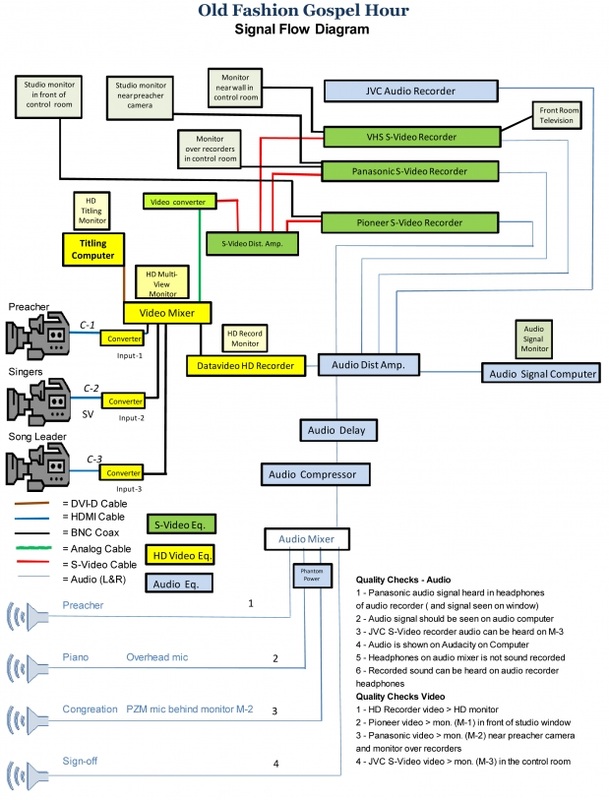
On top of that, he was able to generate funds by selling the equipment that he didn't need. He took an extra step and called us to price several of the products he was looking at, and because of his attention to detail, we were able to help him get the most productivity for the price without sacrificing quality. - Tip 4: Take time to diagram your set up, your signal flow and organize your workspace. After getting a good idea of what his ideal studio could accomplish and what it would cost, Ottis spoke with us again about connections, and made a diagram of how everything would be interconnected. He also went through the studio and organized it to help his workflow.
Ottis : "I cleaned up the studio and got everything off the floor in regards to wires and all of that. It's much easier to get around and work in the studio, when it's not so cluttered."
Here are two sample diagrams similar to what Ottis had emailed to us when he was making his proposal. (These are not the actual costs of the equipment that Ottis bought.)
Ex 1 - This is a visual representation of what Ottis needed, and list of what it could cost.
These first steps will help you achieve your goals much faster and much more accurately. Properly planning in the early stages is essential to getting the best production out of your studio. In Part 2, we'll talk about which equipment Ottis bought, and go step-by-step on how it is interconnected.
Part 2:Setting up the studio
Once Ottis purchased all his equipment, the obvious next step was to set up the studio. One advantage he had over most inexperienced producers was that the old SD equipment in his studio just had to be replaced with the new. However, we are still going to discuss the connections here to make it easier for you to adopt your own set up. In Part 1 of this series we covered taking the time to diagram your signal flow and ideal set up. Here's when that time spent planning is going to pay off.
First let's look at the equipment. Here is the bulk of what Ottis purchased to convert the studio to HD:
- 3 HDMI Cameras ( Panasonic)
- Datavideo SE-2000 video switcher
- 3 Datavideo DAC-9 Converters
- HDR-40 HD Recorder
- Titling/character Generation PC computer ( Otis ended up building this, saving him another $500.00)
- HD to SD video converter ( to record all output and monitor footage in Front/green room)
- 3 HD monitors ( one to monitor the switcher, one for the titling computer, one to monitor the HD Recorder)
- Datavideo AD-100 Audio delay box
This is the rest of the equipment that Ottis uses to complement his HD units:
- 3 SD Recorders: Pioneer DVD. Panasonic HD/DVD, JVC S-Video
- 1 PC computer to monitor the audio
Software:
- Audacity (for audio-this software is available for free in PC and MAC formats, http://audacity.sourceforge.net/
- Sony Vegas Pro 9.0 (for post production/editing video and audio).
This set up described will work best for a smaller production studio/set up with 3-4 cameras, and a computer for titles or character generation. Ottis has a control room and a green room (also called the front room, the guests in his studio could watch tapings there) in addition to the studio area where the program is shot. Note: This set up will still work well even if you don't have a separate control room. Another detail to note is that the "Old Fashion Gospel Hour" is pre-taped, edited in Vegas 9.0 then distributed to the TV station on a Blu-Ray DVD. A live shoot may be set up differently (regarding your camera set and you may be using a lap top computer) but the hook-ups will generally be the same.
You may be wondering at this point how hard it may be to learn to run an HD set-up if you've been using standard definition for awhile. Ottis found that learning to use all the equipment was surprisingly easy. It's mostly terminology that you may have to familiarize yourself with. Most of Ottis's questions were answered either by Datavideo customer service or simple Google searches. If all else fails, read the instructions!
Step 1: Cameras to the Switcher
Since Ottis's cameras were HDMI and the SE-2000 uses HD-SDI inputs (among others see links at the bottom of the article), he used the Datavideo DAC-9 Converters to convert his HDMI signal to HD-SDI (see above). He then connected an HDMI cable into the DAC-9s then connected those via BNC cable to the switcher. All three inputs were then monitored one of his View Sonic VS13223 HD monitors. The SE-2000 internally generates a multi-view preview screen for all inputs as well the program out, so you can see in real time what your production looks like for broadcast:
Step 1 continued: Monitoring Camera Input/Output:
Notice how Ottis how Ottis has several monitors set up. The one on the far right of the picture mounted on the wall is for the camera men on the in the studio with the preacher and singers. Those monitors help the camera men see everything, what's going on in the studio as well as what they are taping. This is not always necessary but a good idea if you can implement it. There is a monitor ( (13inch TVs) in for the preacher/choir with lead ins and cues. Creating a monitoring system early on will help your team synchronize better.
Step 2: Titling Computer to the Switcher
For professional looking video, character generation is always a plus. Thanks to technology advancing as it is, almost anyone can create professional looking character generation using just PowerPoint. This can be a great way to learn and understand how character generation works before going out and dropping a few hundred dollars on a CG program.
Connect your computer to the DVI-D in on the SE-2000 switcher. In this case Ottis was using a PC, but you can also connect a Mac system with no issue. Just make sure your DVI-D adaptors from the computer to the switcher are the appropriate ones for your computer model. Make sure that both units are off when connecting them.
After connecting them, turn the switcher on first, then the computer. This will ensure each unit recognizes the other properly.
If you connect and do not see an image in one of the preview screens, there are several things that could be happening:
- Resolutions don't match up:
- Check the resolution settings on both your computer and the switcher and make sure they match. Usually the computer will match these up automatically, but sometimes they do get confused.
Hertz Rates don't match up: - Hertz is the rate which the image on the screen refreshes. You can see what your computer is set at by looking at resolution or monitor settings. In the switcher, you can look at mode settings in the user menu.
The computer can't "see" the switcher: - Restart the computer and tell it to find a secondary monitor. That should resolve any other recognitions issues.Step 3: Switcher to the HD recorder
Ottis used the Datavideo HDR-40 as his main switcher output recorder but he also recorded output from the switcher on to his SD recorders as a backup. He converted one of the outs (SE-2000 output is HD) to his AV Tool converter.Connecting to the HDR-40:
Via 1 BNC cable, Ottis connected the HD-SDI out to the HDR-40's HD-SDI in. Fairly simple. To make sure that unit was recording, he also attached one of his ViewSonic Monitors to the HDR-40 using the HMDI out to see what the recorded footage.
Connecting to the HD to S-Video Converter:
Via the HD Component (YUV) out on the SE-2000, Ottis connected to the AV Tool Converter, then from the converter to the S-Video Distribution Amp
Step 4: Audio (HD Recorder to the monitor and Audio dist amp. Audio to Distribution Amp, Recorders, and computer monitor.Please note that this set up may differ from what your production needs, so make sure to research what would work best in your situation)
Recording Audio for your video can be tricky if you have more than one sound source. Ottis had mapped out how ne needed his audio beforehand, so when it came to connecting the audio it was as simple as following the map to connect everything. You may not have as many audio sources as Ottis, but its still a good idea to figure out how you are going to get your sound. You also have to consider audio delay, which occurs because video and audio are recorded at different rates. That is why its also important to check for audio sync when recording audio separately.
So let's look at the set up:
Mics: Notice that 2 mics are connected to Phantom Power. Phantom power gives power to the mics and amplifies the sound source without overloading signal. This is ideal in this case because Ottis wanted to pick a good signal from the singers without turning up the mics. Turning up the mic could result in "dirty" sound that might be hard to work with.
Audio Mixer, Compressor, Delay Box:
The mixer "combines" all the sound sources, and also creates a way for you control the audio levels that are being recorded.
The compressor "normalizes" the combined audio signal, bringing it up to the highest decibel level without overloading the signal.
The delay box matches the rates that the audio and video are being recorded at so that you do not have sync loss.
Audio Distribution Amp:
Because Ottis is recording his audio to several different locations, the distribution amp keeps the audio signals at high quality. The quality of the audio will degrade as the signal is being split, so the unit essentially keeps that from happening. Most times you won't need one of these unless you are sending audio signal to several devices.
Audio Signal Computer:
Ottis wanted a clear indication of what his audio signal looked like in sound wave form so he monitored it with software.
The software that he used was Audacity, which is available for free download in Mac or PC formats.
Make sure to run several tests to make sure that all your signals are traveling where you want them to, and also that all your signals are at the quality that you would like. Depending on your needs, you may not need as many audio components as Ottis, but its good to know what can help your audio to sound the best it can, since you are also producing Hi quality Video.
Recording the audio and video
We've gotten past the hard part of connecting the video components, and now recording your video sources should be relatively easy. By now you should have tested all your connections, so all you have to worry about is if your recorder is actually recording all the footage. Test this early. Run a few rehearsals (As Ottis does) to make sure you have clear idea of what issues you have to face once you start shooting.
Setting up the recorder:
This was fairly simple. In this case, Ottis was just recording the output of the switcher and the input of the audio distributer onto the HDR-40. He connected the HD-SDI out of the switcher via one BNC cable.
Monitoring the recorder:
To see what the recorder is was saving, Ottis also set up a monitor (see above). This is a great idea because you want to make sure the video signal stays the same throughout. Your source video may always look great, but remember that the signal is being processed on its way to the recorder. Monitoring the signal will help eliminate any surprises you may encounter, like lines or static because of a bad connection somewhere. The HDR-40 has an HDMI out for a monitor. If that monitor has speakers you will also hear the embedded audio that was recorded.
Transferring recorded files:
Most video recorders will have the option to import files directly into your computer or connect via a removable hard drive. The HDR-40 has the latter option. Ottis connects the removable hard drive to his computer and copies the files that he wants to edit onto the computer hard drive. He does this so that he doesn't affect his raw files by accident.
Recording Audio:
You'll notice in Ottis's set up diagram (Part 2 of this article), there are several audio components other than just the mics. Ottis included the following equipment: Phantom Power for two mics, an audio mixer, and audio compressor, audio delay box, audio distribution amp and a computer to monitor the audio signal.
Each of those components has a specific job (see Part 2 of this article) and in order to get the best recording, you should also run audio tests with each before you record anything. Record some audio with and without video so you have a reference point of what each file should ideally sound like. This reference point will help you determine what tweaks need to be made to get the best sound when putting your whole project together.
Audio Settings:
All of the audio components mentioned above have factory settings. It's always recommended to research what the settings do, and what is recommended for you're application, but you can also just play with settings to get a sound mix that you like. However there are some settings you shouldn't just play with unless you know what you're doing:
These settings affect the audio file in ways that are sometime inaudible, but will cause problems later if you try to sync them with video. You should only change those settings if you know exactly what you're doing with the audio files.
Settings you can play with:
Here are some other things to consider when recording audio:
Microphones: When recording your source, its best to use a mic that is designed to record that source. For example there are mics designed for singers and drummers, and you wouldn't use one for the other. There are also mics designed for picking up the environment around it, and those are good if you're going be recording sound for a large area like at a concert or recording a band. Find out what will work for what you are doing.
Ambient Sound:
Even in a relatively controlled environment like a studio, there is such a thing as ambient sound. It is the sound of movement of the air or traffic outside or just small sounds that we don't think about in the day to day. However, those sounds can be picked up by your equipment. That can dirty up a sound file when you try to amplify it. This is another reason why you should do recording checks before you start shooting, and find out exactly what type of mic to use if you are recording outdoors.
Setting up the recorder:
This was fairly simple. In this case, Ottis was just recording the output of the switcher and the input of the audio distributer onto the HDR-40. He connected the HD-SDI out of the switcher via one BNC cable.
Monitoring the recorder:
To see what the recorder is was saving, Ottis also set up a monitor (see above). This is a great idea because you want to make sure the video signal stays the same throughout. Your source video may always look great, but remember that the signal is being processed on its way to the recorder. Monitoring the signal will help eliminate any surprises you may encounter, like lines or static because of a bad connection somewhere. The HDR-40 has an HDMI out for a monitor. If that monitor has speakers you will also hear the embedded audio that was recorded.
Transferring recorded files:
Most video recorders will have the option to import files directly into your computer or connect via a removable hard drive. The HDR-40 has the latter option. Ottis connects the removable hard drive to his computer and copies the files that he wants to edit onto the computer hard drive. He does this so that he doesn't affect his raw files by accident.
Recording Audio:
You'll notice in Ottis's set up diagram (Part 2 of this article), there are several audio components other than just the mics. Ottis included the following equipment: Phantom Power for two mics, an audio mixer, and audio compressor, audio delay box, audio distribution amp and a computer to monitor the audio signal.
Each of those components has a specific job (see Part 2 of this article) and in order to get the best recording, you should also run audio tests with each before you record anything. Record some audio with and without video so you have a reference point of what each file should ideally sound like. This reference point will help you determine what tweaks need to be made to get the best sound when putting your whole project together.
Audio Settings:
All of the audio components mentioned above have factory settings. It's always recommended to research what the settings do, and what is recommended for you're application, but you can also just play with settings to get a sound mix that you like. However there are some settings you shouldn't just play with unless you know what you're doing:
- Recording speed (SP or LP)
- Bit rate (Kpbs)
These settings affect the audio file in ways that are sometime inaudible, but will cause problems later if you try to sync them with video. You should only change those settings if you know exactly what you're doing with the audio files.
Settings you can play with:
- Volume
- EQ
- Gain
Here are some other things to consider when recording audio:
Microphones: When recording your source, its best to use a mic that is designed to record that source. For example there are mics designed for singers and drummers, and you wouldn't use one for the other. There are also mics designed for picking up the environment around it, and those are good if you're going be recording sound for a large area like at a concert or recording a band. Find out what will work for what you are doing.
Ambient Sound:
Even in a relatively controlled environment like a studio, there is such a thing as ambient sound. It is the sound of movement of the air or traffic outside or just small sounds that we don't think about in the day to day. However, those sounds can be picked up by your equipment. That can dirty up a sound file when you try to amplify it. This is another reason why you should do recording checks before you start shooting, and find out exactly what type of mic to use if you are recording outdoors.
Add a professional touch with character generation
 return false'>)
What is Character Generation?
Character generation is the fancy text and graphics animation that you see on the News and other TV programs. It's also the graphics that you see in the lower third of the screen, or in the left or right corner of your TV. It usually lets you know what station you're watching or what's coming up next.
Adding moving text and graphics to your video productions really polishes your work all together, and adding it can be as simple as owning a computer with PowerPoint installed. Ottis uses PowerPoint through his titling computer that is connected to the Datavideo SE-2000 switcher via the DVI-D port. He uses it for animations like rolling credits and show ID.
Here's how to add basic CG with PowerPoint just like Ottis did using the SE-2000 switcher:
Step 1: Prep in PowerPoint:
Step 2: Computer to Switcher
Step 3: Configuring the Overlay
Here's a video sample of one of Ottis's finished results:
http://www.ofgh.org/videos/preachers/eld-danny-raines/caney-fork-tn-eld-danny-raines-1518
Character generation is the fancy text and graphics animation that you see on the News and other TV programs. It's also the graphics that you see in the lower third of the screen, or in the left or right corner of your TV. It usually lets you know what station you're watching or what's coming up next.
Adding moving text and graphics to your video productions really polishes your work all together, and adding it can be as simple as owning a computer with PowerPoint installed. Ottis uses PowerPoint through his titling computer that is connected to the Datavideo SE-2000 switcher via the DVI-D port. He uses it for animations like rolling credits and show ID.
Here's how to add basic CG with PowerPoint just like Ottis did using the SE-2000 switcher:
Step 1: Prep in PowerPoint:
- Prepare your slides - Overlaying graphics and text on your footage works best if the backgrounds in your PowerPoint slides are black. Make sure that your text or graphics do not contain black as they will disappear when they are overlaid.
- Set up templates for different shows or events - You can save different slideshow templates and edit them right before you go live. Making a template that has all the logo's and animation that you want already done saves time and allows for easy rehearsal when you cycle through slides. It's better to set up templates rather try to create new slideshows and animations at your shoot. Doing this will help workflow whether you are going live or taping.
Step 2: Computer to Switcher
- Get the appropriate DVI-D adaptor for your computer (MAC or PC) as not all DVI-D outs on computers are the same size.
- While the computer and SE-2000 switcher are off, connect to the DVI-D in.
- Turn the switcher on first then the computer. This is to help make sure each unit recognizes the other properly.
Step 3: Configuring the Overlay
- What makes everything come together is the Luminance Key feature in the SE-2000 switcher. Luminance key works in a similar fashion to Chromakey, only Luminance refers to keying out shades of black or white and Chroma deals with keying out specific colors, usually green or blue.
- Once you set the Luminance to key out black, (Select the range to 28 in the Luminance settings in the menu ), you'll easily be able to see the overlaid text and graphics in the preview or program screen.
Here's a video sample of one of Ottis's finished results:
http://www.ofgh.org/videos/preachers/eld-danny-raines/caney-fork-tn-eld-danny-raines-1518
Editing and Distributing your video
Now that you have recorded your HD footage, there are several ways to edit and distribute your finished work . In this case, Ottis needed to edit and distribute his finished product to a TV station for broadcast, but he also put an archive of videos up on the shows website, http://www.ofgh.org for people to be able to watch on the internet. With the popularity of internet videos and channels on the rise, knowing how to edit/optimize your videos for the web is definitely a plus. We'll cover both methods here.
Uploading files to the internet:
If you're uploading to YouTube or Vimeo or any one of the available video sites, they will tell you exactly what to upload to get the best quality video. Most of the time, those sites will automatically compress the video, and this is the easiest way to get your videos onto the internet. Remember however that these sites have file size limits, so adjust your files accordingly. If you have a 30 minute show/program, most likely you're going to have to cut the show into segments, so take the time to find out how to get larger files on the internet if you do not have your own server.
Also, we recommend that your computer have a high bandwidth internet connection to avoid your files being cut off or interrupted during an upload.
We've covered from start to finish how to get started with your own HD video production; hopefully these tips will help you tackle your next video project!
- Editing:
- Tip# 1:
Knowing video file formats will help you decide what editing software to buy if you don't already have it, or help you decide what recorder or conversion software to get if your editing software only accepts certain video formats. This is also important if you plan on streaming to internet or creating videos for new media like the iPhone, iPad or other portable formats. Once you know what formats you want to work with, you can start your project knowing what size and format to output your video for the best looking result. - Tip# 2: Make copies of your recorded files before you start to edit.
- Tip# 3: Get file conversion software or at least know where you can get it. You may think that you don't need to convert your files because the editing software you have and the files that you import easy work together, but the beauty of file conversion software is that you can get it for free and it comes in handy when you least expect it. For instance, if someone else is going to edit your footage and their software doesn't read your file format, the conversion software will help greatly. Another reason you may need it is if you need to playback your footage on a portable playback hard drive (Western Digital makes these) or some other portable playback device. Conversion software is a valuable tool to have just in case your regular editing software doesn't convert to all formats.
- Tip# 4: Research Editing Software: What software you buy usually comes down to two things: how much you know and how much you can afford. If you know very little about editing video, its best to see which products can give you the best bang for your buck. You also want to consider how quickly you want to produce something. It's great to go out and buy the industry standard software, but if you don't know how to use it, it's completely useless.
- Distributing formats: You've heard it several times in this article but I cannot stress enough the value of doing homework and knowing what you need and what will work best for you.
Burning to DVD's:
DVD's are still the easiest way to showcase footage that is going to be played as is. Usually the software you are using has options that enable you to create settings on a DVD for it to play automatically in a player or in a computer.
DVD's are a no- brainer for whoever you give it to, and you won't have to wonder if they opened up the right file or used the right program to see your footage.
What type of DVD should you use? DVD+R is recommended widely because once you burn to this type of DVD, it can be read by a multitude of DVD players. Make several test DVD's before sending them out if you can. If you're using a program that can make DVD menus for your video, make sure that they menus and buttons work. - Video for the Internet:
Prepping your video for internet will most likely mean you have to convert your file for streaming. Here are the most popular formats: Real Media, Windows Media, QuickTime, MPEG4 (MPEG4 generally loads rather quickly no matter what browser you are in). Converting files for the internet requires you to compress the file, so always start with a large, high quality file. Squeezing files down to a smaller high quality video is always better than trying to upload large quality files, especially if you don't know much about uploading videos.
It's tempting to just edit the file straight from your recorder or camera when you're done filming. It's especially tempting if your recorder comes with a removable hard drive that connects directly to your computer. Ottis had this option in the Datavideo HDR-40, but he still decided to make copies. If you edit the original file right away, you run the risk of saving over your original file.
If your computer's hard drive is not large enough to copy the files you are about to edit, archive the original files to DVD or get an external hard drive with a terabyte or more on it. Try and make a habit of backing up your original files before doing any editing. Ottis makes sure to always back up all his original files so that they are never edited over or altered by accident. He has quite a large library of these files now, but he is confident that whenever he needs his raw footage, its right here when he needs it.
Some programs that have a relatively easy learning curve are: Sony Vegas, Core Video Studio Pro and Adobe Premiere Elements. These programs are made with ease of use in mind, so they are a good place to learn the basics of editing with software, and getting professional looking results at the same time.
Uploading files to the internet:
If you're uploading to YouTube or Vimeo or any one of the available video sites, they will tell you exactly what to upload to get the best quality video. Most of the time, those sites will automatically compress the video, and this is the easiest way to get your videos onto the internet. Remember however that these sites have file size limits, so adjust your files accordingly. If you have a 30 minute show/program, most likely you're going to have to cut the show into segments, so take the time to find out how to get larger files on the internet if you do not have your own server.
Also, we recommend that your computer have a high bandwidth internet connection to avoid your files being cut off or interrupted during an upload.
We've covered from start to finish how to get started with your own HD video production; hopefully these tips will help you tackle your next video project!
 return false'>)
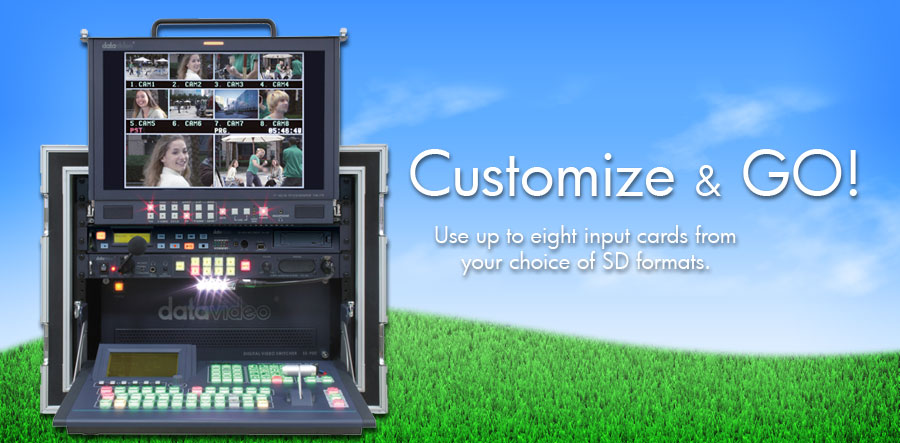
MS-900 Mobile Studio
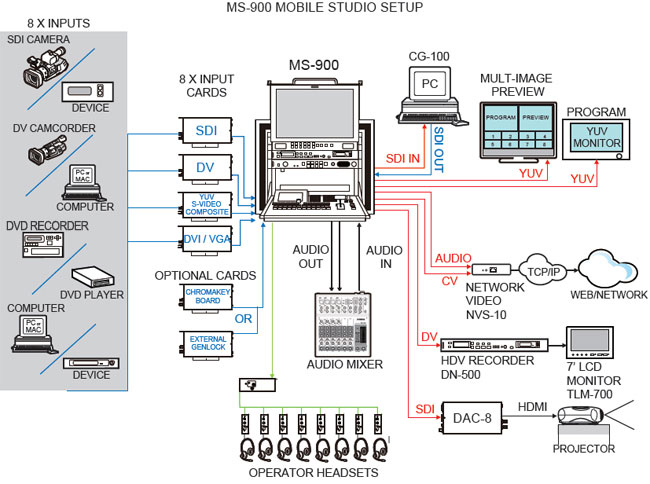
MS-900 Mobile Studio Fully Customize Your Studio Datavideo’s MS-900 is a ready-to-go 8-input SD studio in a flight pack that includes a switcher with a multiview output, recorder with a removable HDD, intercom (with 8x beltpacks, headsets, mics, and tally lights), and a 17″ monitor, all connected to a power supply that works on 12v or local power. The SE-900 switcher accepts any combination of up to eight input boards for DV, SDI, DVI,VGA, YUV, S-Video and composite video. Option cards include: 2 channel chromakey, external genlock and SDI output. MS-900 Key Features
Customizable* MS-900 allows owners to customize their mobile studio with cards of their choosing. See the list of cards below. Four Input Chromakey MS-900 can cut between two backgrounds and two foregrounds. Chromakey card required. In-Sync Built-in frame synchronizer and Time Base Corrector for each channel. Composite Video Preview Each input card offers a Composite Video Preview Output, irrespective of the input type. Live in Seconds Easy setup, breakdown, and storage at any location Durable Anti-shock padding protects the MS-900 during transit. Dual-Channel Audio Output Each DV and SDI video input has an audio de-embedder which provides dual channel balanced No Gen-Lock Required No Gen-Lock is required with the MS-900. Ultimate Video Compatibility Switch and mix video of any SD (standard definition) signal type (DV, Analog, S-Video etc.) NTSC & PAL Compatible MS-900 can work in NTSC or PAL formats.
Customizable* MS-900 allows owners to customize their mobile studio with cards of their choosing. See the list of cards below. Four Input Chromakey MS-900 can cut between two backgrounds and two foregrounds. Chromakey card required. In-Sync Built-in frame synchronizer and Time Base Corrector for each channel. Composite Video Preview Each input card offers a Composite Video Preview Output, irrespective of the input type. Live in Seconds Easy setup, breakdown, and storage at any location Durable Anti-shock padding protects the MS-900 during transit. Dual-Channel Audio Output Each DV and SDI video input has an audio de-embedder which provides dual channel balanced No Gen-Lock Required No Gen-Lock is required with the MS-900. Ultimate Video Compatibility Switch and mix video of any SD (standard definition) signal type (DV, Analog, S-Video etc.) NTSC & PAL Compatible MS-900 can work in NTSC or PAL formats.
Full specification of MS 900 Mobile Studio
Connections
Video
Audio
Control
What’s in the Box
Additional Specs.
Video
- Inputs: up to 8 inputs with a choice of SDI, DV, DVI, component (Y:U:V), S-Video (Y/C) & Composite
- Outputs: Optional SDI, DV, YUV, S-Video and/or Composite
Audio
- Inputs: Stereo Pair – Balanced XLR and RCA
- Outputs: Stereo Pair – Balanced XLR and RCA
Control
- RS-232 or RS-422 control interface
What’s in the Box
- SE-900 Switcher – User selects input cards and option cards (4-8 total)* to determine price. See the list of MS-900 Cards below.
- TLM-170 pull-out 17″ monitor
- ITC-100 intercom kit with 8 belt packs, headsets, and tally lights
- DN-500 DV/HDV Hard Disk Drive Recorder
- PD-1 Power Distributor
- Aluminum Case
- Flip-down Holder for SE-900 control panel
- Dimensions
- Length: 24.4 in. / 620 mm
- Width: 23.6 in. / 600 mm
- Height: 25.6 in. / 650 mm
- Weight: 141 lbs / 64 kg
Additional Specs.
- Processing:8-bitInput Cards
900-YUV Analog Video Input Card For users who require input from a range of popular analog video formats including composite video, S-Video (Y/C) and component (Y:U:V). Built-in TBC syncs each input, enabling non-genlock gear to be used without glitches. Features a useful composite Video monitor output, for easy connection to an external preview monitor. 900-DV25 DV Input Card For users who work with digital video (DV). The DV input board also de-embeds the audio to a pair of balanced outputs. 900-SDI SDI Input Card For users who work with SDI. Also includes audio de-embedding to a balanced pair. Features a useful composite monitor output for easy connection to an external preview monitor. 900-DVI DVI-D / VGA Input Card Connect a computer and switch between live video and popular computer applications such as presentation and more. Perfect for live events like worship and company presentations. Features a composite monitor output, for easy connection to an external preview monitor. Input Cards
900-YUV Analog Video Input Card For users who require input from a range of popular analog video formats including composite video, S-Video (Y/C) and component (Y:U:V). Built-in TBC syncs each input, enabling non-genlock gear to be used without glitches. Features a useful composite Video monitor output, for easy connection to an external preview monitor. 900-DV25 DV Input Card For users who work with digital video (DV). The DV input board also de-embeds the audio to a pair of balanced outputs. 900-SDI SDI Input Card For users who work with SDI. Also includes audio de-embedding to a balanced pair. Features a useful composite monitor output for easy connection to an external preview monitor. 900-DVI DVI-D / VGA Input Card Connect a computer and switch between live video and popular computer applications such as presentation and more. Perfect for live events like worship and company presentations. Features a composite monitor output, for easy connection to an external preview monitor.Optional Cards
900-DVK Four-Channel Chromakey Function Card Create a virtual chromakey video studio with glitch-free switching between up to four video inputs. You can pair 4 foregrounds (e.g. talent/actor in front of the camera) and backgrounds (like 3D backgrounds). The internal TBC takes care of synchronizing, even non-genlock equipment, like consumer camcorders can be used. 900-SDI-0 SDI Output Card For users who work with SDI. There are two SDI outputs and one Black burst output. Audio from MS-900′s XLR input is automatically embedded into the SDI stream. 900-GENLOCK Genlock Card The Genlock card allows the SE-900 to accept an external reference signal. This is typically used in a studio where a single references signal must be used. Included Cards
900-DVI-MULTI DVI Multi Card The multi-image output display allows all inputs, master & next source output to be displayed on a single monitor, with super-imposed tally and source info to assisst the producer in a hectic live production environment. RS-232/422 External Control RS-232, RS-422 & GPI control interface board allows easy integration with existing equipment that can be controlled such as tape recorders and players or presentation control panels. SDI Overlay Card A down stream keyer (DSK) board that offers both internal and external keying options. Perfect for integration with character generator hardware/software such as Datavideo’s CG-100 or CG-350. Analog / DV Output Card Output card for a range of popular video formats – DV (with embedded audio from the audio delay circuit), composite video, S-Video (Y/C) and component (Y:U:V).
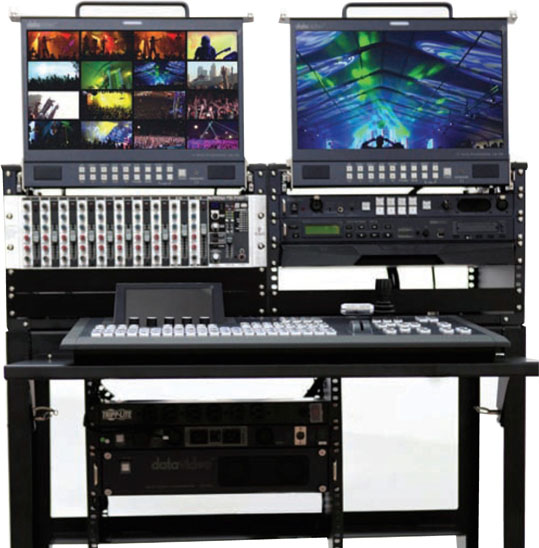
MS-2800 Mobile Studios
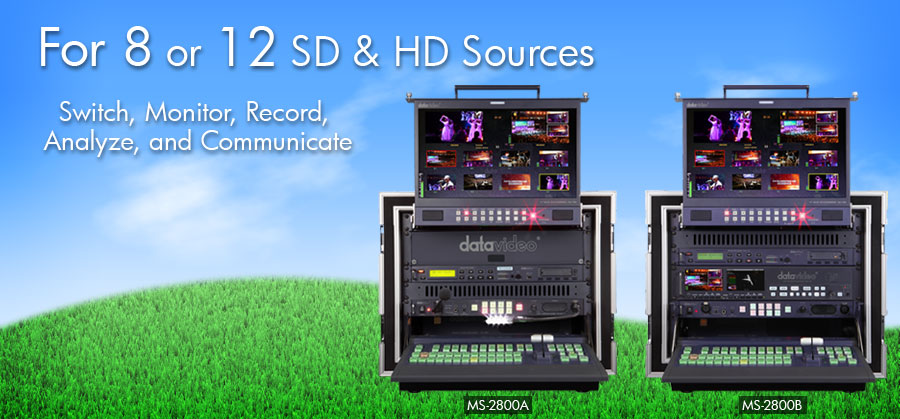
MS-2800 Mobile Studio SD & HD Mobile Studios for SDI, HDMI, & Composite Video The SE-2800 Switcher is available in a Mobile Studio that can be carried by hand, with every piece mounted conveniently in a durable aluminum case. The MS-2800 comes in two versions — MS-2800A and MS-2800B.
MS-2800A comes with the SE-2800 Switcher, ITC-100 Intercom/Tally System (with 4x belt packs, headsets, mics, and tally lights), PD-2 Power Distributor, HDR-55 Hard Drive Recorder, Slide-Out TLM-170HM Monitor, and AD-100 Audio Delay.
MS-2800B comes with everything that the MS-2800A comes with, but it also includes the VSM-100 Waveform Monitor / Vectorscope, DAC-50 SDI-to-Analog Converter, and optional PD-3 Power Distributor.
MS-2800 Key Features
Uses the New SE-2800 Switcher A rock festival is touring, and multiple stages need to be filmed live. Luckily, the producer has the SE-2800. SD & HD Support MS-2800 supports both Standard Definition and High Definition signals. Eight Flexible Inputs Flexible combinations of input sources may be used from SD/HD-SDI, HDMI, and CV. Upgradable to 12 Inputs MS-2800 may be upgraded with 4 more BNC input ports to support a total of 12 inputs. 2x HDMI Multi-View Preview Outputs The MS-2800 Switcher has two HDMI-out ports for the multi-view preview, one for the switcher operator and one for the director. PAL or NTSC Compatible MS-2800 accepts input from PAL or NTSC signals. Audio Embedding MS-2800 Supports Audio Embedding.
Switcher’s Connections
Video Inputs
Accepted Resolutions
Video Outputs
Audio
Control
What’s in the Box (MS-2800B)
MS-2800A comes with the SE-2800 Switcher, ITC-100 Intercom/Tally System (with 4x belt packs, headsets, mics, and tally lights), PD-2 Power Distributor, HDR-55 Hard Drive Recorder, Slide-Out TLM-170HM Monitor, and AD-100 Audio Delay.
MS-2800B comes with everything that the MS-2800A comes with, but it also includes the VSM-100 Waveform Monitor / Vectorscope, DAC-50 SDI-to-Analog Converter, and optional PD-3 Power Distributor.
MS-2800 Key Features
Uses the New SE-2800 Switcher A rock festival is touring, and multiple stages need to be filmed live. Luckily, the producer has the SE-2800. SD & HD Support MS-2800 supports both Standard Definition and High Definition signals. Eight Flexible Inputs Flexible combinations of input sources may be used from SD/HD-SDI, HDMI, and CV. Upgradable to 12 Inputs MS-2800 may be upgraded with 4 more BNC input ports to support a total of 12 inputs. 2x HDMI Multi-View Preview Outputs The MS-2800 Switcher has two HDMI-out ports for the multi-view preview, one for the switcher operator and one for the director. PAL or NTSC Compatible MS-2800 accepts input from PAL or NTSC signals. Audio Embedding MS-2800 Supports Audio Embedding.
Switcher’s Connections
Video Inputs
- 8x SD/HD-SDI or
- 6x SD/HD-SDI + 2x HDMI or
- 4x SD/HD-SDI + 4x CV or
- 4x SD/HD-SDI + 2x CV + 2x HDMI or
- 2x SD/HD-SDI + 4x CV + 2x HDMI
- Upgradable with 4 additional BNC ports to support 12 total inputs
Accepted Resolutions
- 1080i 50/60
- 576i 50
- 480i 59.94/60
Video Outputs
- 2x HDMI (Multi-Preview)
- 3x SD/HD-SDI
Audio
- Inputs: 4x Analog Balanced XLR
- Outputs: 2x Analog Balanced XLR
- Supports Embedded Audio to SD/HD-SDI
Control
- RS-422 Control
- SE-2800 Switcher
- ITC-100 Intercom/Tally System with 4x Belt Packs, Headsets, and Tally Lights
- PD-2 Power Distributor
- HDR-55 Hard Drive Recorder
- Slide-Out TLM-170HM Monitor
- AD-100 Audio Delay
What’s in the Box (MS-2800B)
- SE-2800 Switcher
- ITC-100 Intercom/Tally System with 4x Belt Packs, Headsets, and Tally Lights
- PD-2 Power Distributor
- HDR-55 Hard Drive Recorder
- Slide-Out TLM-170HM Monitor
- AD-100 Audio Delay
- VSM-100 WFM/VS
- DAC-50 SDI-to-Analog Converter
- PD-3 Power Distributor (Optional)
MS 2800 Mobile Studio
MS-2800 Mobile Studio SD & HD Mobile Studios for SDI, HDMI, & Composite Video The SE-2800 Switcher is available in a Mobile Studio that can be carried by hand, with every piece mounted conveniently in a durable aluminum case. The MS-2800 comes in two versions — MS-2800A and MS-2800B.
MS-2800A comes with the SE-2800 Switcher, ITC-100 Intercom/Tally System (with 4x belt packs, headsets, mics, and tally lights), PD-2 Power Distributor, HDR-55 Hard Drive Recorder, Slide-Out TLM-170HM Monitor, and AD-100 Audio Delay.
MS-2800B comes with everything that the MS-2800A comes with, but it also includes the VSM-100 Waveform Monitor / Vectorscope, DAC-50 SDI-to-Analog Converter, and optional PD-3 Power Distributor.
MS-2800 Key Features
Uses the New SE-2800 Switcher A rock festival is touring, and multiple stages need to be filmed live. Luckily, the producer has the SE-2800. SD & HD Support MS-2800 supports both Standard Definition and High Definition signals. Eight Flexible Inputs Flexible combinations of input sources may be used from SD/HD-SDI, HDMI, and CV. Upgradable to 12 Inputs MS-2800 may be upgraded with 4 more BNC input ports to support a total of 12 inputs. 2x HDMI Multi-View Preview Outputs The MS-2800 Switcher has two HDMI-out ports for the multi-view preview, one for the switcher operator and one for the director. PAL or NTSC Compatible MS-2800 accepts input from PAL or NTSC signals. Audio Embedding MS-2800 Supports Audio Embedding.
Switcher’s Connections
Video Inputs
Accepted Resolutions
Video Outputs
Audio
Control
What’s in the Box (MS-2800B)
MS-2800A comes with the SE-2800 Switcher, ITC-100 Intercom/Tally System (with 4x belt packs, headsets, mics, and tally lights), PD-2 Power Distributor, HDR-55 Hard Drive Recorder, Slide-Out TLM-170HM Monitor, and AD-100 Audio Delay.
MS-2800B comes with everything that the MS-2800A comes with, but it also includes the VSM-100 Waveform Monitor / Vectorscope, DAC-50 SDI-to-Analog Converter, and optional PD-3 Power Distributor.
MS-2800 Key Features
Uses the New SE-2800 Switcher A rock festival is touring, and multiple stages need to be filmed live. Luckily, the producer has the SE-2800. SD & HD Support MS-2800 supports both Standard Definition and High Definition signals. Eight Flexible Inputs Flexible combinations of input sources may be used from SD/HD-SDI, HDMI, and CV. Upgradable to 12 Inputs MS-2800 may be upgraded with 4 more BNC input ports to support a total of 12 inputs. 2x HDMI Multi-View Preview Outputs The MS-2800 Switcher has two HDMI-out ports for the multi-view preview, one for the switcher operator and one for the director. PAL or NTSC Compatible MS-2800 accepts input from PAL or NTSC signals. Audio Embedding MS-2800 Supports Audio Embedding.
Switcher’s Connections
Video Inputs
- 8x SD/HD-SDI or
- 6x SD/HD-SDI + 2x HDMI or
- 4x SD/HD-SDI + 4x CV or
- 4x SD/HD-SDI + 2x CV + 2x HDMI or
- 2x SD/HD-SDI + 4x CV + 2x HDMI
- Upgradable with 4 additional BNC ports to support 12 total inputs
Accepted Resolutions
- 1080i 50/60
- 576i 50
- 480i 59.94/60
Video Outputs
- 2x HDMI (Multi-Preview)
- 3x SD/HD-SDI
Audio
- Inputs: 4x Analog Balanced XLR
- Outputs: 2x Analog Balanced XLR
- Supports Embedded Audio to SD/HD-SDI
Control
- RS-422 Control
- SE-2800 Switcher
- ITC-100 Intercom/Tally System with 4x Belt Packs, Headsets, and Tally Lights
- PD-2 Power Distributor
- HDR-55 Hard Drive Recorder
- Slide-Out TLM-170HM Monitor
- AD-100 Audio Delay
What’s in the Box (MS-2800B)
- SE-2800 Switcher
- ITC-100 Intercom/Tally System with 4x Belt Packs, Headsets, and Tally Lights
- PD-2 Power Distributor
- HDR-55 Hard Drive Recorder
- Slide-Out TLM-170HM Monitor
- AD-100 Audio Delay
- VSM-100 WFM/VS
- DAC-50 SDI-to-Analog Converter
- PD-3 Power Distributor (Optional)
SE-2800 Switcher HD/SD Switcher for SDI, HDMI, & CV The SE-2800 is a multi-definition switcher designed for the event or activity that needs up to eight SD or HD input sources. Being one of our most flexible switching solutions, the SE-2800 is able to accept eight total inputs in varying combinations of Interlaced SD/HD-SDI, HDMI, and CV sources. (Up-conversion not supported)
Use eight SD/HD-SDI inputs, or use six SD/HD-SDI inputs and two HDMI inputs. Users can even accept four SD/HD-SDI sources, two CV sources, and two HDMI sources. This 8-input switcher is even upgradable to 12 inputs for even more versatility. SE-2800 ensures that your next switcher will accept all your input gear and then some!
The SE-2800 Studio Kit comes with a few extra goodies to help you get up and running in no time! Included with the SE-2800 is the HDR-55 Hard Drive Recorder, ITC-100 Intercom System (with 4x belt packs, headsets, mics, and tally lights), and two TLM-170H 17″ Desktop Monitors.
SE-2800 Key Features
The New SE-2800 Switcher A rock festival is touring, and multiple stages need to be filmed live. Luckily, the producer has the SE-2800. SD & HD Support SE-2800 supports both Standard Definition and High Definition signals. Eight Flexible Inputs Flexible combinations of input sources may be used from SD/HD-SDI, HDMI, and CV. Upgradable to 12 Inputs SE-2800 may be upgraded with 4 more BNC input ports to support a total of 12 inputs. 2x HDMI Multi-View Preview Outputs The SE-2800 Switcher has two HDMI-out ports for the multi-view preview, one for the switcher operator and one for the director. PAL or NTSC Compatible SE-2800 accepts input from PAL or NTSC signals. Audio Embedding SE-2800 Supports Audio Embedding.
Click Here for Full Specifications Connections
Video Inputs
Accepted Resolutions
Video Outputs
Audio
Control
Tally
What’s in the Box (SE-2800 Studio Kit)
Use eight SD/HD-SDI inputs, or use six SD/HD-SDI inputs and two HDMI inputs. Users can even accept four SD/HD-SDI sources, two CV sources, and two HDMI sources. This 8-input switcher is even upgradable to 12 inputs for even more versatility. SE-2800 ensures that your next switcher will accept all your input gear and then some!
The SE-2800 Studio Kit comes with a few extra goodies to help you get up and running in no time! Included with the SE-2800 is the HDR-55 Hard Drive Recorder, ITC-100 Intercom System (with 4x belt packs, headsets, mics, and tally lights), and two TLM-170H 17″ Desktop Monitors.
SE-2800 Key Features
The New SE-2800 Switcher A rock festival is touring, and multiple stages need to be filmed live. Luckily, the producer has the SE-2800. SD & HD Support SE-2800 supports both Standard Definition and High Definition signals. Eight Flexible Inputs Flexible combinations of input sources may be used from SD/HD-SDI, HDMI, and CV. Upgradable to 12 Inputs SE-2800 may be upgraded with 4 more BNC input ports to support a total of 12 inputs. 2x HDMI Multi-View Preview Outputs The SE-2800 Switcher has two HDMI-out ports for the multi-view preview, one for the switcher operator and one for the director. PAL or NTSC Compatible SE-2800 accepts input from PAL or NTSC signals. Audio Embedding SE-2800 Supports Audio Embedding.
Click Here for Full Specifications Connections
Video Inputs
- 8x SD/HD-SDI or
- 6x SD/HD-SDI + 2x HDMI or
- 4x SD/HD-SDI + 4x CV or
- 4x SD/HD-SDI + 2x CV + 2x HDMI or
- 2x SD/HD-SDI + 4x CV + 2x HDMI
- Upgradable with 4 additional BNC ports to support 12 total inputs
Accepted Resolutions
- 1080i 50/60
- 576i 50
- 480i 59.94/60
Video Outputs
- 2x HDMI (Multi-Preview)
- 3x SD/HD-SDI
Audio
- Inputs: 4x Analog Balanced XLR
- Outputs: 2x Analog Balanced XLR
- Supports Embedded Audio to SD/HD-SDI
Control
- RS-422 Control
Tally
- D-SUB 15-Pin
- SE-2800 Main Unit *
- SE-2800 Control Panel
- AC/DC Power Adaptor & Cord (12V 5.0A 110/220)
- Instruction Manual
- * Main unit available by itself or with control panel
What’s in the Box (SE-2800 Studio Kit)
- SE-2800 Main Unit
- SE-2800 Control Panel
- 2x TLM-170H 17″ Monitors
- HDR-55 Recorder
- ITC-100 Intercom System (w/ 4x belt packs, headsets, mics, and tally lights)
- RKM-2000 Frame/Holder
- AC/DC Power Adaptor & Cord
- Instruction Manual
SE-2000 Switch & Studio Kit 5-input HD Studio Switch & Studio
SE-2000 Switcher & Studio Kit 5-input HD Studio Switcher & Studio Kit Datavideo’s SE-2000 is a HD-SDI switcher that is ideal for small live production venues that use up to 5 inputs. By combining 1 or 2 DVI-D sources and 3 or 4 HD-SDI sources, any user can make the most of this flexible unit. The HD-SDI inputs may be HD cameras or small HDMI output cameras that can be used with a Datavideo DAC-9, HDMI to HD-SDI converter (not included). With Datavideo’s CG-350 software, CG (character generation) may be added to any live production via computer, through the DVI-D input. PowerPoint® presentations can also be used via the computer as a source or overlaid using the luminance key. The SE-2000’s multi-display output includes each source, preview display, program display, PIP, and a digital clock display. In addition, the system will store and recall 14 different logos. It has 5 memory settings (user-defined) and title overlay. The SE-2000′s built-in audio mixer has four audio-follows-video inputs (microphone or line), and two audio outputs. Operating the SE-2000 is easy and time-efficient because every control is right on the work surface. As with all Datavideo products, the SE-2000 works on 12vDC or local power.
SE-2000R is the rack-mounted version of the SE-2000 Switcher. Conveniently mount in your rack system, and free some desk space while controlling it via RS-232. (Includes SE-2000 features minus audio functionality t-bar)
SE-2000 Studio Kit comes with everything that the standard SE-2000 does, plus a few extra goodies to help you get up and running in no time! Included with the SE-2000 switcher is the RKM-2000 Rack, with the mounted ITC-100 Intercom System (with 4x belt packs, headsets, mics, and tally lights), the TLM-170H LED Monitor, and the HDR-55 Hard Drive Recorder.
SE-2000 Key Features
5-input HD Switcher SE-2000 accepts up to 5 inputs for HD switching. Studio Kit Available SE-2000 Studio Kit comes with additional hardware to get you up and running faster! See below. Pre-Stored Logos SE-2000 comes with 14 pre-stored logos (max 128 x 96) inserted via luminance key. Impressive Features SE-2000 is built with impressive features like Luminance key, PIP, Freeze Image, and Black. Usable with Tally Lights Tally signal output (live and next source)
Additional Specs.
What’s in the Box (Standard SE-2000)
What’s in the Box (SE-2000 Studio Kit)
Video
Audio
Control
Tally
Dimensions
SE-2000R is the rack-mounted version of the SE-2000 Switcher. Conveniently mount in your rack system, and free some desk space while controlling it via RS-232. (Includes SE-2000 features minus audio functionality t-bar)
SE-2000 Studio Kit comes with everything that the standard SE-2000 does, plus a few extra goodies to help you get up and running in no time! Included with the SE-2000 switcher is the RKM-2000 Rack, with the mounted ITC-100 Intercom System (with 4x belt packs, headsets, mics, and tally lights), the TLM-170H LED Monitor, and the HDR-55 Hard Drive Recorder.
SE-2000 Key Features
5-input HD Switcher SE-2000 accepts up to 5 inputs for HD switching. Studio Kit Available SE-2000 Studio Kit comes with additional hardware to get you up and running faster! See below. Pre-Stored Logos SE-2000 comes with 14 pre-stored logos (max 128 x 96) inserted via luminance key. Impressive Features SE-2000 is built with impressive features like Luminance key, PIP, Freeze Image, and Black. Usable with Tally Lights Tally signal output (live and next source)
Additional Specs.
- Input Resolution: 1920x1080i & 1280x720p
- Output resolution: 1080i – 720p
- Processor: 10 bit internal processing
- Controls: Five individual speed keys, T bar (work in both directions) and TAKE key
- Memory: Five user preset memories
- Transition: 13 transitions with adjustable border width
- Preview: Multi-image preview monitor output
- Power: 12V 3A DC 110/220 (1.5A for SE-2000R)
What’s in the Box (Standard SE-2000)
- SE-2000 Unit
- AC Power Cord
- AC/DC Power Adaptor (12V DC 3.0A)
- Instruction Manual
What’s in the Box (SE-2000 Studio Kit)
- SE-2000 Unit
- AC Power Cord
- AC/DC Power Adaptor (12V DC 3.0A)
- Instruction Manual
- HDR-55 Hard Drive Recorder
- ITC-100 Intercom System (w/ 4x belt packs, headsets, mics, and tally lights)
- TLM-170H Monitor
- RKM-2000 Holder
- CB-20 Cable
Video
- Inputs: 4x HD-SDI and 1x DVI-D or 3x HD-SDI and 2x DVI-D
- Output: 2x HD-SDI, 1x HD-YUV & DVI (Multi-view)
Audio
- Inputs: 4x XLR microphone or line audio inputs (excl. SE-2000R)
- Outputs: 2x Stereo XLR (excl. SE-2000R)
- Embedded Audio: n/a
Control
- RS-232
Tally
- 1x Tally (PGM & PVW)
Dimensions
- Length: 12.9 in. / 330 mm
- Width: 16.9 in. / 429 mm
- Height: 3.3 in. / 85 mm
- Weight: 8.1 lbs. / 3.7 kg
